debian 12.5设置静态IP地址及编辑器使用注意事项
debian 12.5目前是开源中比较优秀的linux操作系统:
由于安装debian操作中,IP地址是自动获取的,可以使用界面安装版,操作比较方便。
安装操作系统可以使用:ip addr 查看动态IP地址,然后使用宝塔ssh软件或其他软件登录使用。我这边在设置方面遇到很大问题。
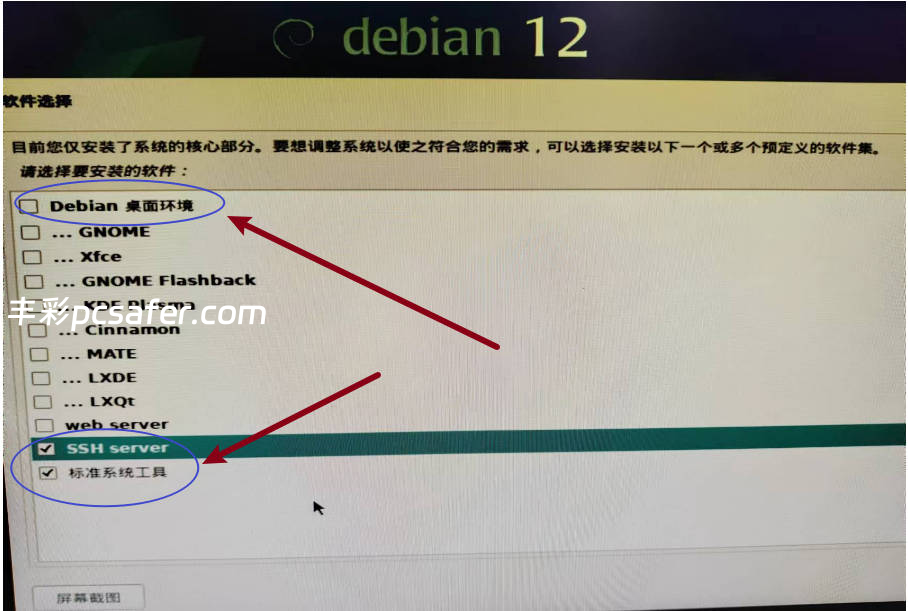
图形化设置就更方便,看下图重点圈住的!

1、安装完系统,ssh登录后执行
ip addr查看IP地址
由于什么编辑都没有安装只能用系统自带的编辑器
2、修改IP地址
切换超级管理员  su
输入root密码
vi /etc/network/interfaces这里要注意的键盘 i 代表输入,X键 删除。delete键也是删除,请自行百度关于debian编辑器的操作方法。

示例:
auto eth0
iface eth0 inet static
address 192.168.1.100
netmask 255.255.255.0
gateway 192.168.1.1
dns-nameservers 8.8.8.8 8.8.4.4
设置完后,按esc键退出,然后按:输入wq,回车保存
3、重启网络
systemctl restart networking.service然后修改ssh信息,登录终端,ping www.qq.com

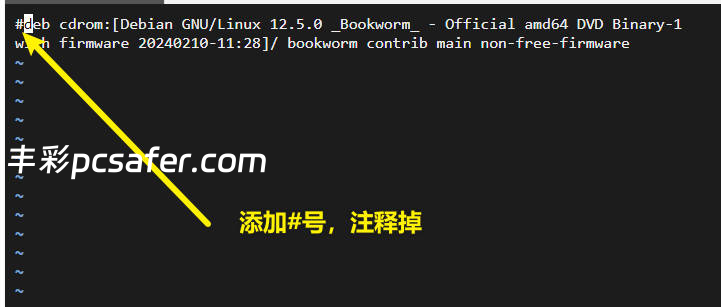
A.盘片插入驱动器“/media/cdrom/”再按「回车」键,如何解决。
vi /etc/apt/sources.list
bash: sudo: 未找到命令,如何解决。按照上一步完成后,运行sudo出现未找到命令。
先不要急着运行命令。我们要添加国内更新源。复制下面,到ssh更新,如果你在安装中已经修改了更新源则不用!以上操作。
cat <<'EOF' > /etc/apt/sources.list
# 默认注释了源码镜像以提高 apt update 速度,如有需要可自行取消注释
deb https://mirrors.ustc.edu.cn/debian/ bookworm main contrib non-free non-free-firmware
# deb-src https://mirrors.ustc.edu.cn/debian/ bookworm main contrib non-free non-free-firmware

deb https://mirrors.ustc.edu.cn/debian/ bookworm-updates main contrib non-free non-free-firmware
# deb-src https://mirrors.ustc.edu.cn/debian/ bookworm-updates main contrib non-free non-free-firmware

deb https://mirrors.ustc.edu.cn/debian/ bookworm-backports main contrib non-free non-free-firmware
# deb-src https://mirrors.ustc.edu.cn/debian/ bookworm-backports main contrib non-free non-free-firmware

# 以下安全更新软件源包含了官方源与镜像站配置,如有需要可自行修改注释切换
# deb https://mirrors.ustc.edu.cn/debian-security bookworm-security main contrib non-free non-free-firmware
# # deb-src https://mirrors.ustc.edu.cn/debian-security bookworm-security main contrib non-free non-free-firmware

deb https://security.debian.org/debian-security bookworm-security main contrib non-free non-free-firmware
# deb-src https://security.debian.org/debian-security bookworm-security main contrib non-free non-free-firmware
EOF
保存编辑文档
然后运行 apt-get update -y
apt-get install sudo 可以进行安装。
升级所有已安装的包到最新版本:
sudo apt upgrade
推荐更新源:https://linuxmirrors.cn/use/
安装cockpit
apt-get install cockpithttps://ip:9090 登录
如果root登录不了,可以修改
vi /etc/cockpit/disallowed-users
将root删除,保存文件。刷新系统就可以完成登录了!
转载地址:https://www.pcsafer.com/3293.html
版权问题:https://docs.qq.com/form/page/DUUlkWW10TW9sT0x1
版权问题:https://docs.qq.com/form/page/DUUlkWW10TW9sT0x1
THE END